Happy New Year! We start off 2023, hoping for a wonderful and prosperous year for us all. We are delighted to open the new year with exciting news. We are thrilled to announce that we now have Bing search coverage in even more GEOs than ever before to help you serve searchers around the globe.
Additionally, you will be able to reach over 60 countries with our mobile traffic coverage. While desktop traffic has increased in the last few years, mobile traffic is still growing. The list of countries now serviced across desktop and mobile are Albania, Andorra, Argentina, Australia, Austria, Belgium, Bosnia, Brazil, Bulgaria, Canada, Chile, Colombia, Croatia, Cyprus, The Czech Republic, Denmark, Finland, France, Germany, Hong Kong, Hungary, Iceland, India, Indonesia, Ireland, Italy, Japan, Latvia, Liechtenstein, Lithuania, Luxembourg, Malaysia, Malta, Mexico, Monaco, Montenegro, Netherlands, New Zealand, North Macedonia, Norway, Peru, Philippines, Poland, Portugal, Romania, San Morino, Serbia, Singapore, Slovakia, Slovenia, South Africa, Spain, Sweden, Switzerland, Turkey, Taiwan, Thailand, United Kingdom, United States, Venezuela, and Vietnam.
We will be happy to assist you in implementing search solutions and helping you make the most of the new locations we are now covering. For more information, we invite you to reach out to your Account Manager.
Not working with us yet? Now is definitely the time!
We are delighted to announce the launch of our new Analytics Center, a suite of tools that empower publishers to grow their businesses across desktop and mobile worldwide.
Here at CodeFuel, we utilize advanced technologies, including Artificial Intelligence and Machine Learning to ensure that user intent results in higher yield for publishers, putting an emphasis on capturing consumers at the right moment and delivering them to the right advertisers.
Today, 68% of all shopping begins online, even if the actual purchase itself happens at a store. This is partly a result of the fact that two-thirds of consumers conduct some form of online research before making their purchase. The more often consumers turn to online content to help them decide on their next purchase, the more decipherable online shopping journeys become. This is where we come in, our efforts are focused on converting intent to revenue, revolutionizing the advertising landscape for both publishers and media buyers.
The newest addition to our publisher-centric tools, The CodeFuel Analytics Center is a data-rich dashboard and a sophisticated tool that enables publishers to gain valuable, actionable insights, improve their strategy, and increase revenue. The center features include real-time insights for traffic optimization, pre-defined performance reports, and customizable analytics presented using various filters and metrics.
“The new dashboard has already received positive feedback from our publishers who are pleased with its ease of implementation, advanced analytical capabilities, and reporting capabilities,” said Tal Jacobson, General Manager, CodeFuel.
“Our teams continue to invest in additional features and tools to help publishers maximize yield and monetization for their digital assets.”
Care to learn more about how you can turn intent into revenue on your digital properties?
If you own a website or are a blogger, chances are you thought about Google AdSense,as a way to earn money from it. Google AdSense is a technology that allows you to earn money by displaying advertisements on your site or blog. Applying to an AdSense account is easy to do if you own a website or blog that meets Google’s requirements.
In this post
Once Google has approved your application, you can start earning money as a publisher, offering your ad space. You don’t need to do more than registering and Google will display relevant ads on your site. If you want to know more about how to apply for Google AdSense, this step-by-step guide will help you create your AdSense account and start making money with your website or blog.
Why Choose Google AdSense?
There are many good reasons to choose Google AdSense for monetizing your website. AdSense is a simple and effective way to monetize your website or blog.
As a program managed by the world’s top search engine company, AdSense is among the most popular ad networks, consistently ranking among the highest-earning performers. In practice, many advertisers compete for advertising space on your site through AdSense, leading to higher ad revenue.
Additionally, AdSense is not only free of charge but also highly trusted by both publishers and advertisers, so you can be confident that you’re working with a reputable company no matter the size of your website.
You should choose Google AdSense because it is the primary and most popular website monetization method available.
However, most rejected accounts typically fail to meet one of the initial requirements necessary to obtain approval. The best way to increase your chances of getting your AdSense account approved is to ensure you meet the following conditions before applying:
You are at least 18 years of age.
You have a Gmail account that you use actively and isn’t already linked to another AdSense account.
You have a live website or blog at least three months old.
The content of your website or blog meets Google’s site behavior and terms of service requirements.
The content on your website or blog is high-quality, relevant, frequently updated, and provides value to visitors.
Your website or blog features a contact page and a privacy policy page.
Your website or blog receives regular traffic. Even though Google doesn’t specify numbers, the more, the better.
To get approved for an AdSense account, you need to meet Google requirements, policies and rules. Not all applications are approved. Avoiding the following mistakes can increase your chances of getting approved:
Your website is too new. Sites should be at least 3 months old.
It is not enough to have good content, you need quantity. Between 30 and 50 articles published can give you enough authority.
Your name or address are incomplete.
The website is not yours.
Your site has non-functioning links.
The site is on an unsupported language. AdSense supports 38 languages, make sure your site is written on one of them, here is the list.
Step-by-Step Guide to Applying for a Google AdSense Account
If you meet the initial requirements and are ready to apply for a Google AdSense Account, here are the steps you’ll need to follow.
The link should redirect you to the Google AdSense application form, asking you to enter your website’s URL and email address. Select whether you want to receive customized AdSense help and suggestion emails, then click “Save and Continue.”
3. Enter Your Details and Verify Your Phone Number
The next page of the application form will ask you to fill out additional information about yourself, including the following:
Your Website (If you want to add your site later, leave this field empty and select I don’t have a site yet);
Your contact name
The name of the individual or business that runs the Gmail account
Your mailing address
Your Gmail address
Your phone number
It is essential to ensure all information entered during this stage is correct and up-to-date, as Google will employ two verification methods: phone number and mailing address. Upon entering your information, Google will send a verification code to your device to verify your phone number, then a PIN code via mail to the provided address.
Completing the phone verification process is critical to continuing the application. You should receive temporary approval status within 24 to 48 hours of completing phone verification. In specific instances, Google support warns that some cases may take longer to process, with a maximum possible wait time of 2-4 weeks.It is essential to ensure all information entered during this stage is correct and up-to-date, as Google will employ two verification methods: phone number and mailing address. Upon entering your information, Google will send a verification code to your device to verify your phone number, then a PIN code via mail to the provided address.
More information on Activating Your AdSense Account HERE
4. Take Advantage of Your Temporary AdSense Approval
Obtaining temporary AdSense approval allows you to place ad units on your website or blog and start collecting revenue. If you have multiple sites, you are not obligated to send an application for each of them; having temporary approval allows you to place ads on any website you own or manage.
Although you can place and show ads anywhere on your sites, remember to follow best practices and recommendations regarding optimal ad unit creation and placement. For instance, you should build your content and ad units to entice your visitors to click.
5. Verify Your Account to Gain Approval Permanently
To obtain permanent approval status and fully activate your AdSense account, you must verify the PIN code that Google mailed to you. PIN code mail takes between 1 and 10 days to arrive, depending on your location, postal services, and local conditions
Account verification will also require you to enter payment information. You will need to provide Google with the following details:
Bank account details
Tax information
Phone number
Completing this step and providing accurate information is critical if you wish to receive ad revenue payments.
Note about the permanent approval: Keep in mind Google remains with the right to suspend your account anytime.
How to Log in?
After signing up for a new Google AdSense account, the sign-in process is straightforward. Simply follow these steps:
Enter the email address you used during the signup process.
Enter the password associated with that email address.
Click “Sign in.”
If you haven’t yet done so, Google may remind you to read the latest version of the Google AdSense Terms and Conditions and confirm that you have read and acknowledged them. Check the “I agree” checkbox when you have.
How to Add Google AdSense to Your Site?
If you already have an active Google AdSense account and a site or blog ready to receive ads, here are the steps to follow to add Google AdSense to your site.
1. Ensure Your Website is Compliant with Google Policy
Websites participating in the Google AdSense program must meet Google’s terms of service and not break any of the rules outlined in the AdSense Program policies.
Complete list of actions that can invalid your approval status:
The following actions can invalidate your approval status (whether temporary or not) and cause you to lose access to revenue:
The following actions can invalidate your approval status (whether temporary or not) and cause you to lose access to revenue:
Invalid impressions: Do not click on your own ads, generate your own traffic, or otherwise artificially inflate your website impressions, including manually.
Non-rewarded inventory: Do not incentivize or deceive your visitors into clicking the ads placed on your website. For example, offering compensation in exchange for clicking on your ad units is unacceptable.
Improper ad placement: Although Google incentivizes experimenting with different ad formats and placement methods, using excessive amounts of ad units or invasive placement methods (e.g., pop-up ads, spam emails) is not allowed.
Improper ad behavior: You may modify your Google AdSense ad codes as long as the modifications do not harm advertisers or artificially increase ad performance.
Traffic source violations: Google AdSense ad units cannot be placed on web pages receiving traffic from specific sources. For instance, participating in AdSense prohibits you from using third-party services and methods to generate impressions, such as pay-to-click programs or unsolicited mass emails.
Deceptive navigation elements: Do not create and place ads intentionally, so visitors can easily mistake them for navigation elements (e.g., menus, download links).
Improper site behavior: Google requires websites with AdSense to meet specific standards for ease of navigation. You will lose approval if your website changes user preferences without the user’s consent, initiates unexpected downloads or redirects to irrelevant or unwanted websites, opens excessive amounts of pop-ups or pop-unders, or contains viruses or malware.
After verifying that your site is compliant, you may begin configuring your ad units and decide what ads you want to run on your website.
Open your AdSense dashboard, navigate to the left-hand menu, and look for “Ad units” under “Content.” Click on “Ad units” to open the menu of the same name. From there, you can start creating and configuring ads.
Google provides different ad sizes and formats, for example, Large Rectangle and Leaderboard, for you to experiment with and test how well they fit with your content. If you’re unsure which ad sizes you need, Google also provides recommendations in the form of green checkmarks. Ad formats featuring the green checkmark are among the most popular for advertisers.
You can also configure text and search result ads with the Text & Display Ads function. Google may display a green checkmark next to this function if it has determined your website may benefit from using this type of ad. Don’t forget to configure ad styles and ensure they match your website’s color pattern.
Once you have configured your ad units, scroll to the bottom of the menu and click “Save and get code.” You will obtain an HTML code snippet; copy it and insert it into your website’s code according to where you want to place them.
If you have little website coding experience or prefer a more guided approach, you can also use ad management plugins (e.g., AdSanity) to help insert your ad codes into your website.
4. Update Your Privacy Policy and Contact Page
As per Google guidelines, all websites participating in the AdSense program must have an up-to-date contact page and a privacy policy page. Ensure that your website features both and that your privacy policy page complies with Google’s required content guidelines.
How Does the Payment Work?
If your account is active and Google has validated your banking and tax information, you are eligible to start receiving ad revenue payments.
Payment Options
Google offers multiple payment method options to AdSense account owners, depending on the account owner’s country of origin and preferences. The available payment options are:
Direct transfer to your bank account
Electronic Funds Transfer (EFT)
Wire transfer
Checks sent to a mailing address
Western Union payment
If you haven’t specified a preferred payment option, Google will be unable to pay you even if you are otherwise eligible. To select or verify your payment preferences, open the AdSense dashboard, click “Payments,” and check the “How you get paid” window to see your currently selected method. To choose or change an existing one, click “Manage payment methods” and follow the instructions.
Payee Names and Changes
The payee name is the name with which you sign up to Google AdSense. It is extremely important that your payee name is the same name that appears in your bank account. Any discrepancies, and Google payments won’t reach you.
What happens if you make a mistake? Changing the payee name of your account can be difficult, if not downright impossible. The AdSense Terms and Conditions only allow you to change your payee name in case of marriage, death or company mergers.
In some countries, like India, it is straight up forbidden to change the payee name once you’ve signed up. The list of countries where you cannot change the payee name is not public. How would you know if you can do it? If the option is not available to you, it means your country is not supported.
According to Google terms and conditions regarding payment, active AdSense accounts must meet specific thresholds before account owners can select a payment method or start receiving money in their bank account.
The minimum threshold to select a payment method is either 10 USD or an equivalent value in your currency. For example, accounts set to receive in Mexican pesos (MXN) must meet the equivalent of 10 USD or approximately 202.55 MXN (as of August 2022).
You must meet the minimum payment threshold corresponding to your currency to start receiving money on your account. This threshold is distinct from the payment method threshold: each currency has a fixed threshold value that does not necessarily correspond to the current exchange rate.
For example, accounts in USD must hit the minimum threshold of $100 before the owner or manager can receive the money. AdSense accounts set in Euros (EUR) must reach a 70 EUR threshold.
Table of supported currencies and minimum payment thresholds:
Currency
🇺🇸 United States Dollar (USD)
🇦🇺 Australian Dollar (AUD)
🇨🇦 Canadian Dollar (CAD)
🇨🇱 Chilean Peso (CLP)
🇨🇿 Czech Koruna (CZK)
🇩🇰 Danish Krone (DKK)
🇪🇺 Euro (EUR)
🇬🇧 Great Britain Pound (GBP)
🇭🇰 Hong Kong Dollar (HKD)
🇭🇺 Hungarian Forint (HUF)
🇮🇩 Indonesian rupiah (IDR)
🇮🇱 Israeli Shekel (ILS)
🇯🇵 Japanese Yen (JPY)
🇲🇽 Mexican Peso (MXN)
🇲🇦 Moroccan Dirham (MAD)
🇳🇿 New Zealand Dollar (MZD)
🇳🇴 Norwegian Krone (NOK)
🇵🇪 Peruvian Sol (PEN)
🇵🇱 Polish Zloty (PLN)
🇸🇬 Singaporean Dollar (SGD)
🇿🇦 South African Rand (ZAR)
🇸🇪 Swedish Krona (SEK)
🇨🇭 Swiss Franc (CHF)
🇹🇳 Tunisian Dinar (TND)
🇹🇷 Turkish Lira (TRY)
🇦🇪 Emirati Dirham (AED)
🇺🇾 Uruguayan Peso (UYU)
Minimum payment threshold
$100
A$100
C$100
CLP$60,000
Kc 2,000
Kr 600
€70
£60
HK$800
Ft 20,000
Rp 1,300,000
₪400
¥8,000
Mex$1,200
DH 800
NZ$130
Kr 600
S/300
zł 300
S$150
R1,000
Kr 700
Fr 100
DT 200
₺200
DH 350
U$2,400
Payment Schedules
Google AdSense pays monthly, typically between the 21st and the 26th of each month. Most users should receive their payments within the first 48 hours of this period, although some delays may occur.
If you are experiencing significant payment delays, ensure that your banking and tax information is correct and that you have met the minimum payment threshold for the month.
Review the Guidelines and Terms & Conditions
Due to differences between laws and regulations in every country, Google AdSense terms and conditions vary depending on your country of origin, which Google determines based on your billing address. If you wish to read and review the Terms & Conditions for your country, visit this page and select your country from the drop-down menu.
Besides the terms and conditions, AdSense account owners and managers are expected to know and understand the program’s guidelines and policies, which apply worldwide.
FAQs
How much does Google AdSense cost?
Google AdSense is free. No fees are required to apply for a new account or maintain an existing one.
How do I know my AdSense account’s approval status?
Log into your AdSense account and visit your dashboard. If you see earning statistics, your account is currently approved, either temporarily or permanently.
How much can I earn with AdSense?
Although it’s impossible to predict how much you can expect to earn accurately because earnings vary depending on multiple factors. These include the amount of traffic you receive, where your visitors come from, the type and relevance of your content, which niche your website belongs to, and how you have configured your ads.
Which site niches are the most profitable?
As of 2022, some of the most profitable site niches for AdSense are law, cryptocurrency, insurance, automotive, electronics, health & fitness, and marketing.
Can I have more than one AdSense account?
It is against the terms and services for a single person to have more than one Google AdSense account. If you attempt to run multiple accounts from the same billing address, Google may suspend or terminate all of them.
Get Help Setting Up Google AdSense with CodeFuel
Properly configuring your Google AdSense account and settings is essential if you wish to monetize your website and start earning money through one of the world’s most popular ad networks.
If you need help setting up your account, optimizing ad placement, or boosting website monetization, our experts at CodeFuel have the skills and resources to assist you. Contact us today for more information.
The Video Ad Serving Template (VAST) standard allows publishers to serve video ads from multiple ad sources. VAST tags improve ad delivery efficiency and provide greater control over the video ad experience for both publishers and advertisers.
In this post
Learn everything you need to know about the VAST standard, how to create a VAST tag, how it works, what versions exist, and how to troubleshoot potential errors.
What is a VAST Tag?
A VAST tag is a script to facilitate communication between an ad server and a video player. VAST tags are defined and standardized by the Interactive Advertising Bureau (IAB), allowing relevant ads to play on any combination of websites, user platforms, and video players.
VAST tags are separated into two categories: client-side and server-side.
Client-side VAST tags are a category of scripts where the user’s media player requests advertisements from the ad server, which are then injected and displayed to the user’s video or media player at the right time.
Server-side VAST tags are scripts where the ad server generates the advertisements, then inserts them into the content to be viewed by the user’s media player directly.
How Does VAST Work in Video Players and Ad Servers
Ads served using VAST tags function according to a simple 3-step process: sending a VAST request, receiving a VAST inline response, and pinging the tracking URLs.
1. VAST Request
The user’s video or media player sends a request to the ad server to retrieve a video ad of the correct type and format.
2. VAST Inline Response
When the ad server receives the request for an ad, it returns an inline response. This response contains all appropriate media files and tracking URLs.
3. Pinged Tracking URLs
After receiving and playing the media files to display the ad, the media player activates the tracking URLs to record impressions, allowing the ad server to collect impression data on the ad and help publishers evaluate its performance.
Key Elements of VAST Tags
VAST tags comprise three essential elements: the media file, the video format, and the tracking URL.
Media File
The media file contains an advertiser’s ad creative; in other words, the video or interactive element the user will see. A VAST tag typically includes a link to the corresponding media file, allowing the media player to pull it up and play it.
Video Format
The diversity of user devices, browsers, and media players means that ad servers looking to play their ads to as many users as possible must maintain multiple versions of the same ad creative, often in different file formats.
Consequently, the VAST tag must also define the creative’s file format. Common examples include MP4 and MOV. Non-video file formats such as GIFs are also commonly employed for simpler ads due to their high level of compatibility and low footprint.
Tracking
Tracking URLs are also sometimes known as “tracking pixels,” as they often take the form of a 1 x 1 transparent pixel. Its primary purpose is to collect specific data and track the performance of an ad. Some types of information tracked include:
Viewability (number of times the ad media file has been played and therefore viewed)
Number of users that clicked on the ad to access the corresponding content
Number of users that interacted with the ad (if the ad has interactivity features, e.g., a demo of a game)
Additional Attributes
Besides these three essential elements, a VAST tag can also include extra components and attributes defining its type and appearance. For example, advanced tag options let a publisher define the type of ad (e.g., pre-roll, mid-roll, etc.), the video file’s length, or the ad’s resolution (height and length in pixels).
How to Create a VAST Tag?
Creating your own VAST tag is a relatively straightforward process accessible to any developer or publisher. Three recommended methods are available: manual set-up and coding, Google Manager or a similar ad server, or third-party tools.
Manual Set Up with VAST XML Schema (Extensible Markup Language)
Publishers and developers with experience using the XML (eXtensible Markup Language) format can build their own VAST tags with the <VAST> XML tag.
Remember that all VAST tags open with <VAST version=”x”> and close with </VAST>. Without removing the quotes, replace “x” with the VAST version you wish to use (e.g., 4.1).
Through Google Ad Server
Publishers looking for a more accessible solution can use the predefined parameters in Google Ad Manager.
Follow these steps to create VAST tags in Google Ad Manager:
Sign in to your Google Ad Manager account.
Find the Inventory menu on the left-hand panel, click on it, then click on Ad Units.
Select the ad unit corresponding to the creative you want to build a VAST tag for, then click on Tags.
Fill out the four options: Tag Type, Tag Options, Additional Tag Parameters, and Tag Results.
Review your options, ensure they meet your specifications, then click Copy Tag.
Using Third Party Tools
If you need an alternative to the Google Ad Manager tag builder, third-party tools such as VAST tag generators can help you create VAST tags for your ad creatives. However, each such tool is different and comes with its own instructions. Familiarize yourself with your preferred tag generator before proceeding.
Examples of VAST Tags
Here are a few samples of inline linear VAST tags for VAST versions 3.0 and 4.2.
The Interactive Advertising Bureau (IAB) released the first version Video Ad Serving Template standard, VAST 1.0, in 2008. Since this initial release, the IAB has updated and improved VAST multiple times.
The major milestones in VAST history are the primary version numbers: 1.0, 2.0, 3.0, and 4.0. Smaller and more incremental changes are represented with decimal numbers (e.g., the changes from 4.0 to 4.1).
VAST 1.0 was released on August 1, 2008, supporting basic functionality (play, pause, stop) and basic linear tracking capabilities. The only formats supported at the time were MP4, 3GP, and MOV.
VAST 2.0 increased the number of supported formats and added new functionality, such as player and quartile event tracking (e.g., linear, non-linear, companion, etc.). VAST 2.0 is the oldest version for which VAST 4 offers backward compatibility.
VAST 3.0 offered publishers more modern functionality, such as compliance with OBA standards, skippable ads, and better error reporting functions.
VAST 4.0 is the latest major version, offering additional improvements such as separated options for video and interactive ads, server-side stitching, support for mezzanine files, and closed captioning (CC).
Here is a complete list of VAST versions and release dates:
Version number
Release date
Status (as of August 2022)
VAST 1.0
August 2008
Deprecated
VAST 2.0
March 2012
Supported Backward compatible with 4.0+
VAST 3.0
July 2012
Supported Backward compatible with 4.0+
VAST 4.0
January 2016
Supported
VAST 4.1
November 2018
Supported
VAST 4.2
June 2019
Supported
Difference Between VAST XML and VAST URL
When using Google Ad Manager or a third-party generator, you may have noticed that VAST tags are available in two formats: XML and URL.
Typically, you should always use the VAST XML format. However, specific Demand-Side Platforms (DSPs) can only support the VAST URL format. Check your DSP to determine the best format to use.
How to Validate a VAST Tag
Because most VAST tags employ XML, it is critical to test and validate them before deployment to ensure they contain no bugs and don’t generate any VAST errors.
Multiple VAST tag validation tools are available: Google Video Suite Inspector, Springserve’s VAST Tag Tester, or the IAB’s VAST Tag Validator. To run a tag tester and validator, copy the full XML code of your VAST tag, paste it into the tag tester of your choice, then run it using the Submit button (or an equivalent).
How to Debug a VAST Tag
If your VAST tag returns an error during the validation process, you may need to perform debugging operations. The general principle of debugging is to investigate the error code, locate the source of the problem, and make the necessary corrections (e.g., editing the VAST tag’s XML code).
Examples of common VAST errors and recommended debugging processes:
VAST Error 100
An Error 100 is an XML Parsing Error. It typically indicates an issue with the VAST tag’s XML document or VAST redirect URL. Re-read the VAST tag’s code and ensure it is correctly formatted with no missing or out-of-order symbols.
VAST Error 101
Error code 101 indicates a VAST Schema Validation Error, typically caused by missing or unrecognized XML elements in the VAST tag’s code. The debugging process is similar to debugging an Error 100; investigate the VAST XML and ensure all required elements are present and correctly formatted.
VAST Error 102
A VAST Error 102 means Response Version Not Supported. If you see this error code, the target video player does not support the VAST version specified in the VAST tag. Alternatively, it can indicate a lack of a specified version. Publishers can debug this error by verifying the opening <VAST> tag specifies the correct version.
VAST Error 301
VAST Error code 301 means Redirect Timeout Reached. Although high latency (slow or unstable Internet connections) or poorly optimized web pages are sometimes responsible for this error code, other potential culprits include invalid URIs or incorrect creative dimensions.
Potential debugging methods include verifying the VAST tag features the correct URI and the correct height and length if an ad size is specified.
Benefits of VAST Tags
VAST tags and tools to create and edit them easily have helped ad publishers drastically improve their ability to monetize websites and capitalize on their online ad campaigns.
Here are some of the primary benefits offered by using the VAST standard:
Creating and editing VAST ad tags is relatively easy and does not require an extensive programming background.
VAST tags have simplified communication between an ad network’s servers and media players.
The VAST tag error processing and debugging processes are standardized, reducing playback errors.
Adhering to the VAST standards saves publishers significant time and money.
VAST tags are anessential aspect of modern ad tech. Taking advantage of VAST and the functionality offered by the latest versions (4.0 and beyond) is necessary to maximize the effectiveness of your video ad campaigns.
The online advertising industry has faced widespread ad fraud for years, leading to lost revenue and frustration for publishers and advertisers. In 2019, about 20% of American ad impressions were fraudulent. With sophisticated ad fraud and bots threatening the digital advertising ecosystem, publishers have been scurrying to tackle transparency issues in the ads marketplace.
In this post
The introduction of Ads.txt or Authorized Digital sellers file provides transparency and safety and ensures all clicks and impressions are genuine. Here’s what you need to know about ads.txt and how to implement it on your website.
Brief History of Ads.txt
Cybercriminals carry out ad frauds using fake botnets that mimic human behavior and help generate thousands of counterfeit clicks and visits to sites displaying ads. In addition, domain spoofing allows pirate sites, bot-driven websites, and sites with dubious content to monetize sites otherwise excluded from advertisers or blacklisted by changing the ad tags.
These methods of ad fraud deceive ad exchanges and other platforms into believing the user is visiting a legitimate site when the ad appears on a separate, illegal site.
CNBC reported that advertisers lost $16.4 billion in revenue in 2017 compared to $12.5 billion the previous year. However, due to organizations like the International Advertising Board (IAB) in the spring of 2017, the IAB Tech Lab introduced Ads.txt to help publishers and buyers fight fraud in programmatic advertising.
What Is Ads.txt?
Ads.txt or Authorized Digital Sellers text file is a list of all partners, including publishers authorized to sell your inventory. It ensures that the ad inventory displayed on publisher websites across any ad exchange is legitimate.
Ads.text was initially intended only for online advertising, but now it is also used for mobile apps such as streaming services. The equivalent of Ads.txt files for these streaming services is called app ads.txt. It adds support for mobile app ads and ensures the ad inventory is only sold through authorized channels.
Need of Ads.txt for Publishers and the Advertising Industry
Ads.txt files protect publishers from unauthorized inventory sales and let advertisers check the seller to stop suspicious transactions. For the advertising industry, these files offer transparency in a brand-safe environment.
Increased Transparency
When an advertiser accesses an Ads.txt file and sees that another company has listed their domain as an authorized seller for that specific website, they know there’s no chance it could be fraudulent or unsafe for them to purchase ads from that source. This transparency helps prevent bad actors from selling fake inventory through a publisher’s site without their knowledge and consent.
Ensure Brand Safety in Advertising
Brand safety refers to instances when ads end up on inappropriate websites due to the lack of transparency. Ads.txt helps address these issues by providing a way for advertisers to understand which companies are authorized sellers of ad inventory on a given domain name. It also helps ensure that ads are only displayed on reputable sites and protects brands from inadvertently associating themselves with objectionable content.
Enhances Mobile Advertising
Advertisers always look for ways to reach their target audiences and make the most of their advertising budget. App ads.txt lets advertisers and publishers have more reliable and safer options for reaching mobile audiences. In addition, publishers can control who can sell ads in their apps with the app-ads.txt file.
Benefits of Ads.txt
Creating an Ads.txt File requires little technical skill and knowledge. Publishers can easily create and install Ads.text files on their sites.
Creating an Ads.txt file is Easy
Ads.txt files are easy to create and only take a few steps to upload to a website. This file is saved as a text file and uploaded into the root domain with all the authorized sellers.
Straightforward Updates to Ad.txt files
If a publisher has access to the root domain, they can easily alter and update the Ads.txt file. All they need to do is create a new file with the .txt extension with the updated information and make sure the new.txt file replaces the old.txt.
Secure Access to the Website
Publishers are the only people who can upload Ads.txt files to their websites. This private access ensures no cybercriminals can edit or corrupt the file unless they have the proper credentials to enter the site. They also can’t trick advertisers into selling fake ad inventory.
How Does Ads.txt Work?
Publishers install the Ads.txt file on their websites, confirming their ownership of the domains. They also signal the partner accounts, including ad networks and other publishers, to sell their ad inventory. As a result, advertisers can easily view the authorized partners and their ad inventories.
An advertiser needs to match the publisher ID with the Ads.txt when they receive a bid request from the publisher. If the publisher ID and the Ads.txt match, the advertiser can trust the publisher. If publishers and ad networks have adopted ads.txt, buyers can check ad tags to verify their authenticity. Conversely, when the publisher ID is invalid, the advertiser can choose not to bid on the publisher’s ads.
How to Create and Implement Ads.txt?
A publisher can create an Ads.Txt file using any text editor such as Notepad and Microsoft Word. The IAB Tech Lab specifies that ads.txt files must be formatted with commas between all the lines. Each line in the Ads.txt file should contain the following:
Domain Name
Publishers must include the canonical domain, or the preferred domain, that will sell the ad inventory. It establishes the domain’s ownership for advertisers. The canonical domain is important, especially if the publishers use multiple domains to sell ads. For example, a domain name must be google.com for seller accounts in Google.
Publisher/Account ID
This line represents the unique publisher ID for advertisers to verify the publishers. Publishers can also obtain their publisher IDs through Google Adsense. For example, the publisher ID appears as pub-0000000000000000.
Type of Relationship
Advertisers can know if a publisher is authorized to sell directly or through another party. This line indicates whether the relationship is DIRECT or RESELLER. The DIRECT value means publishers have entered into a direct contract with an ad network. A RESELLER value refers to the publisher authorizing a third party to sell ad space through the domains indicated in the first line on its behalf.
Certification Authority ID
Some advertising networks are verified. Publishers must add the certification authority IDs. Advertisers can use the certification authority ID to identify an ad network within that authority. The Trustworthy Accountability Group (TAG) acts as the certification authority, and the TAGID acts as the ID. For example, a TAG Id can look like this f08c47fec0942fa0.
How to Upload Your Ads.txt File
Once the publisher puts the file together, they can upload it to the site. They can upload Ads.txt files to the domain’s root using FTP or a file manager. Additionally, many web hosts use file managers to deploy Ads.txt files. Upon uploading it to the domain’s root, the file should show as website.com/ads.txt.
How to Set Up Ads.txt
Publishers can set up Ads.txt files through WordPress, Google AdSense, or Google Ad Manager. They must go through a different process to upload the files if they have mobile apps.
WordPress
Various free plugins that manage Ads.txt files are the easiest way to set up Ads.txt in WordPress.
Install the ads.txt plugin on your WordPress website.
Click on Settings > Ads.txt in the left panel to customize the settings.
Add the Ads.txt file and save the settings.
If there is no need for a plugin, a publisher can navigate to the Media tab in the menu. Choose the Add New Button and upload the Ads.txt file there.
Click on Sites and go to the downward arrow. This will open the message to create an ads.txt file.
Choose the Download button. The Ads.txt is automatically downloaded.
Place your ads.txt file in the root directory of your website.
Publishers can check if the upload was successful in their web browser by typing the ads.txt URL such as https://website.com/ads.txt.
Google Ad Manager
Accessing the Ads.txt manager in Google Ad manager requires having at least one connected Ad Exchange account and allowing a user to manage the Ads.txt file.
Select the Web ads.txt tab from the Ads.txt management menu, and then choose to Create an ads.txt file.
A dialog window will pop up for the user to verify the file and its lines.
Two options are available to set up the Ads.txt file: Copy the text to the clipboard before pasting it into your own ads.txt or download the file.
The user can then upload the file into the domain.
Mobile Apps
Uploading an Ads.txt file for a mobile app is similar to setting one up for a website. However, the publisher must create a developer website first to educate customers about their apps and other content. Then, the website must connect to a listing in an app store like Google Play Store, App Store for Android, Apple Store, and other ad networks to prove an app’s ownership.
The publisher can then upload the Ads.txt file to the developer website’s root domain. Verify that the domain matches what appears in the app store. Firebase Hosting is one of the options that Google recommends if your website does not support the publishing of app-ads.txt.
FAQs
How much does Google AdSense cost?
Google AdSense is free. No fees are required to apply for a new account or maintain an existing one.
How do I know my AdSense account’s approval status?
Log into your AdSense account and visit your dashboard. If you see earning statistics, your account is currently approved, either temporarily or permanently.
How much can I earn with AdSense?
Although it’s impossible to predict how much you can expect to earn accurately because earnings vary depending on multiple factors. These include the amount of traffic you receive, where your visitors come from, the type and relevance of your content, which niche your website belongs to, and how you have configured your ads.
Which site niches are the most profitable?
As of 2022, some of the most profitable site niches for AdSense are law, cryptocurrency, insurance, automotive, electronics, health & fitness, and marketing.
Can I have more than one AdSense account?
It is against the terms and services for a single person to have more than one Google AdSense account. If you attempt to run multiple accounts from the same billing address, Google may suspend or terminate all of them.
How much does Google AdSense cost?
Google AdSense is free. No fees are required to apply for a new account or maintain an existing one.
How do I know my AdSense account’s approval status?
Log into your AdSense account and visit your dashboard. If you see earning statistics, your account is currently approved, either temporarily or permanently.
How much can I earn with AdSense?
Although it’s impossible to predict how much you can expect to earn accurately because earnings vary depending on multiple factors. These include the amount of traffic you receive, where your visitors come from, the type and relevance of your content, which niche your website belongs to, and how you have configured your ads.
Which site niches are the most profitable?
As of 2022, some of the most profitable site niches for AdSense are law, cryptocurrency, insurance, automotive, electronics, health & fitness, and marketing.
Can I have more than one AdSense account?
It is against the terms and services for a single person to have more than one Google AdSense account. If you attempt to run multiple accounts from the same billing address, Google may suspend or terminate all of them.
Are Ads.txt files mandatory?
Google recommends adding an Ads.txt file, but it is not mandatory. However, publishers can benefit from having an ads.txt file by stopping counterfeit inventory purchases and ensuring the ad inventory is valid.
How do I fix an Ads.txt file?
If you have incorrect information in the original file, you can replace it by downloading it and making your changes. It is essential to include all the information, including the domain name, publisher ID, and account relationship. Once you’ve modified the file, save and upload it.
How do I verify an Ads.txt file?
Online ads.txt validators offer the most straightforward method for validating ads.txt files. Insert the ads.txt URL into the validator to verify the publisher ID, the domain, and all fields are complete.
In what ways does Google enforce Ads.txt files if I use them?
Google can decide which publishers can show ads using the Ads.txt files in the domain. Then, the company can run an auction for ads on sites with Ads.txt files and the correct publisher IDs. There’s no auction if the publisher ID in the file is incorrect.
Can Ads.txt files be on a subdomain?
Google can search and implement Ad.txt files in subdomains when there is a line for subdomains in the files.
You add a subdomain= declaration to the ads.txt file if you want to reference a subdomain. For instance, if your ads.txt file for website.com has to include the subdomain subdomain.website.com, you would write subdomain=subdomain.example.com in your ads.txt.
Do I need to update my Ads.txt file if I implement header bidding?
You may need to change your file if you also use header bidding to attract advertisers. This is because the Ads.txt file must have frequent updates when you need to add new partners to your list.
Get Expert Advice from CodeFuel
All publishers who want to monetize their websites must include Ads.txt files to show their validity to potential advertisers. Having these files can assure advertisers that their ads can be promoted in a safe environment with total transparency and combat ad fraud.
You can work with CodeFuel to understand how Ads.txt files can work for your site. When you work with CodeFuel, you can learn how to prevent potential ad fraud and reduce losses in your financial revenue.
Your website traffic is worth money and can result in a nice income for your business. While Search Engine Optimization (SEO) is one of the best ways to drive traffic to your site and grow your business, the key is to convert this newly gained traffic into money. That’s where search monetization comes in. In this guide, we’ll walk you through top search monetization strategies you can apply.
In this post
How Much Money Can You Make from Your Website?
There is no “one size fits all” solution regarding website monetization. The income you can make from your website will depend on your site’s purpose and how successful you are at achieving it. Some sites earn millions, and other sites make a few thousand.
How much money is there in blogging?
The content marketing industry is predicted to be worth $412.88 billion by 2021.
Google AdSense is the most popular monetization method for bloggers. Here are some popular methods and average figures:
Food and personal finance bloggers are the ones that make the most income. Food bloggers make an average monthly income of $9.169. The personal finance blogger’s income average is $9.100
Websites earn income when visitors engage with their ads. It could be by generating impressions, engagement, or clicks. Advertisers pay publishers per click, for example, $0.20/click. If 1000 people click on the ad a day, the publisher earns $20/day or $600/month.
When a person wants to buy something in this digital age, the first action is to use a search engine to look for it. Search advertising can be highly effective because consumers have the highest purchase intent when on search engines.
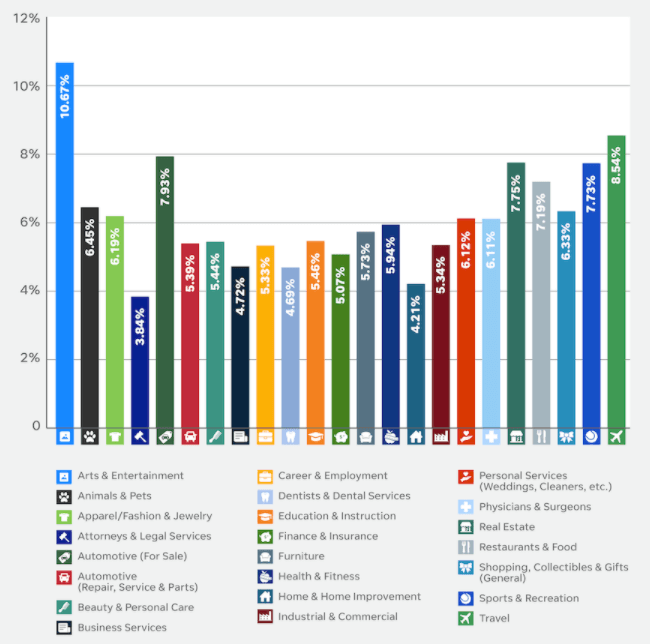
Leveraging search ads is an efficient strategy for monetizing your traffic. Here is an example of average CTR for paid search ads:
Business Category
Arts & Entertainment
Animals & Pets
Apparel / Fashion & Jewelry
Attorneys & Legal Services
Automotive — For Sale
Automotive — Repair, Service & Parts
Beauty & Personal Care
Business Services
Career & Employment
Dentists & Dental Services
Education & Instruction
Finance & Insurance
Furniture
Health & Fitness
Home & Home Improvement
Industrial & Commercial
Personal Services
Physicians & Surgeons
Real Estate
Restaurants & Food
Shopping, Collectibles & Gifts
Sports & Recreation
Travel
Average Click-Through Rate
10.67%
6.45%
6.19%
3.84%
7.93%
5.39%
5.44%
4.72%
5.33%
4.69%
5.46%
5.07%
5.73%
5.94%
4.21%
5.34%
6.12%
6.11%
7.75%
7.19%
6.33%
7.73%
8.54%
What Is Search Engine Monetization?
Search monetization is the group of tools and techniques used by marketers to convert online traffic into revenue.
Monetizing traffic and search combine the efforts to convert visits, actions, and clicks in revenue. Website traffic consists of potential customers—people’s daily activities online, querying search engines to solve a problem or find a product.
Search monetization delivers to users searching for a keyword the answer for their query and generates revenue from it.
You can monetize search queries by having an in-site search box. By doing that, every search your visitors conduct on your site can give you data about what they are looking for. Then, use this information to give your audience what they are looking for, enhancing their search experience by delivering ads that complement their search.
Top 8 Search Engine Monetization Strategies You Should Try For Your Site:
Targeting search engine results can help you generate more sources of revenue than just aiding sales. You can also target search data to monetize your sales. Here are some search engine monetization strategies you can apply:
Search feed monetization
Adding a search feed to your site can help hold longer your visitors on your page. It is more than a simple search bar. A monetized search box helps you earn a fee every time a person conducts a search.
This strategy enables you to maximize revenue for your media buying strategy. Regardless of where you buy your media, you can use CodeFuel to increase profitability. The optimized landing pages for media campaigns help you reap the best from each media channel. The monetization pages can be customized for your own website.
Affiliate Marketing
Affiliate marketing is a marketing arrangement by which an organization pays a commission to a publisher for the traffic or leads generated from its referrals. The publishers are the affiliates, which benefit from the commission and incentivize them to promote the company.
Affiliate links can be placed inside blog posts or articles. Your link to the product in the post, and if users click through, you, as a publisher, earn the commission. In a sense, the success of an affiliate marketing campaign also depends on the success of your SEO strategy. The better you are at search engine optimization, the more traffic you drive to your content, and your visitors will likely click on the affiliate links.
Invest in your SEO
As we explained before, search engine optimization is important for the success of your site. If you invest in your SEO, you get a higher ranking in search engines more traffic, leading to more conversions. How to do it? Here are the five best SEO tips to get more organic traffic in 2022.
Focus on the user experience- Google’s new ranking system, Core Web Vitals, emphasizes user experience. The three criteria they consider include the website’s loading speed, stability, interactiveness, and responsiveness. So if you want to rank higher, you should enhance your user experience.
Use internal linking- According to relevant keywords, internal links are links to different pages within your site. It can be an opportunity to increase traffic to internal pages. In addition, Google can understand the context better via the anchor text, enhancing your overall ranking.
Update existing content- Search engines prioritize the most relevant and fresh content for users. That’s why you should update blog posts regularly. By doing this, you increase the traffic volume and give more value to your visitors. Adding relevant and original data, such as infographics and charts, is important. This will get you more shares.
Drive traffic with long-tail keywords- Long-tail keywords effectively drive traffic for a simple reason: most people use long-tail keywords when writing a search query. These highly specific terms, three words long or more, are usually easier to rank for. For example, instead of targeting the term “evening dress,” go after a more detailed alternative, adding, for example, the color or style. When you do this, by including your short keyword into the long-tail, you can rank for both and attract more organic traffic.
Analyze search intent- Search intent is assessing the intentions and wants of the audience when they search for something. Search intent can be divided into four categories: Informational, navigational, commercial, and transactional.Informational intent refers to a user looking for data about something, such as general information about a topic, a recipe, or a tutorial. A person with navigational intent wants to visit a specific website. These people will type the name of the store or site they are looking for. So, you want to make sure your company appears in search results when someone looks by your name online. Transactional intent happens when a person searches with the purpose of buying something at the moment. Finally, commercial intent has a lower intent than transactional because people intend to buy in the future and use the search engine to research, for example, comparing different fridge brands.
AdSense
AdSense is a Google advertising program that automatically serves ads to your site that are relevant to your target keywords. By strengthening the keyword usage on your site, you ensure that you get ads from the advertisers you want and increase the conversions you get for them. Ultimately, this increases the money you earn.
To make money from AdSense, you need to have at least 100 unique visitors a day. Your content should be unique, and you need to have a Google account to use it with AdSense.
If you have sizeable traffic and wish to add monetization options, then the CodeFuel Search Mediation solution is a great choice. Codefuel helps you maximize your yield per user visit and optimize your landing pages.
Use header bidding
Header bidding is a strategic technique that enables publishers to promote their ad inventory to ad exchanges before the ad servers conduct their online campaigns.
This technique uses programmatic advertising technology to enable publishers to sell ad space at the same time to different ad exchange platforms and ad networks. Thus, publishers can maximize the value of every ad impression.
Header bidding also allows advertisers to be more efficient in better ad targeting by providing automation and bid position. It also enables multiple advertisers to bid on the same ad inventory, increasing the yield for publishers and leveling the field for advertisers.
Advertising
Advertising is one of the most popular monetization strategies and one that can be highly effective if done right. The more traffic your site gets, the more attractive it will be to advertisers. Conducting detailed keyword research is the first step to optimizing your site to drive traffic.
You can sign for an ad network that will present ads relevant to your visitors. You get paid when a visitor clicks on the ad or conducts another desired action. For an ad network to work, your website traffic should be significant. An advantage of using an ad network is that advertisers bid top prices for the ad impressions, so you get the chance of getting high-paying bidders.
To attract top advertisers, every page aspect should be optimized to provide value to your visitors, from the content to the ads and the headers. The better you get at this, the higher the bids your impressions will make.
Sell ad space
If your site has an important amount of traffic, you can sell ad space directly. Here you get to negotiate with advertisers and set the price. While it may seem an attractive option, it is not for everyone. You need to be on top of pricing and advertising rates, as well as looking for advertisers. There is no guarantee that you will get the best price for your ad space.
The Search Advertising Market in 2022 in figures
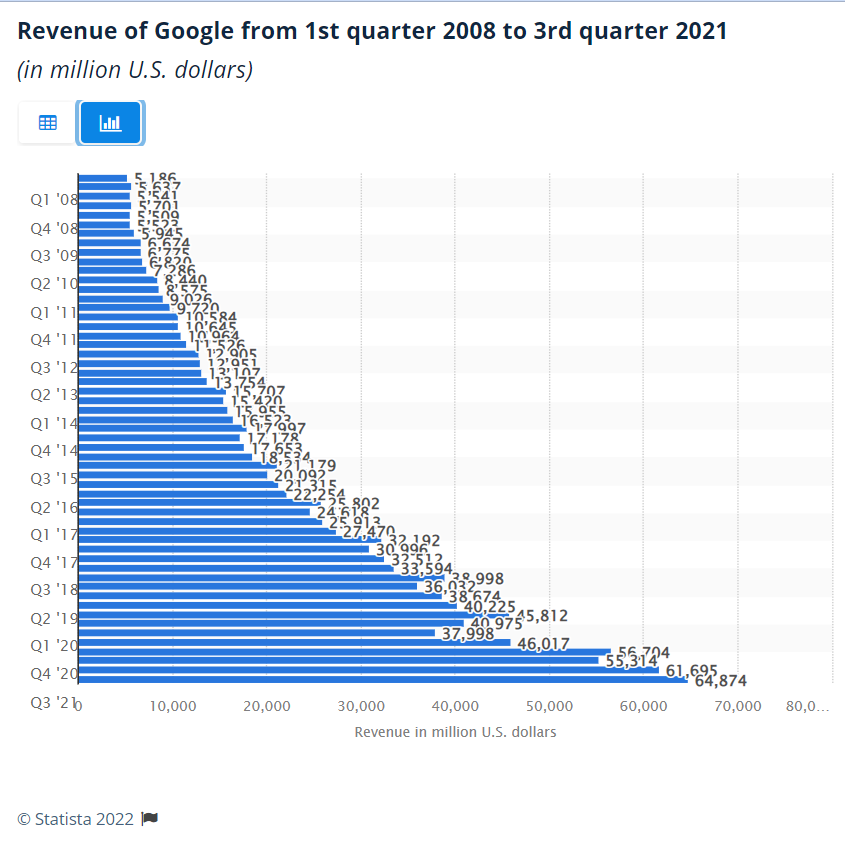
The search advertising market continues increasing, with the greatest percentage of Google’s advertising revenue, coming from search ads. In the last quarter of 2021, Google’s advertising revenue reached $68,874 million.
Monetizing traffic can be an extremely effective strategy to add revenue to your site. The best way to do it is to leverage a monetization platform, like CodeFuel. CodeFuel brings the advantage, not only delivering the highest yield for your impressions but also providing search mediation, so you can make the most of managing your media channels.
CodeFuel leverages AI and machine learning to transform search into revenue. Intent-based search targeting enables to capture consumers when their intent is the highest and delivering the right ad to enhance the customer experience and increase conversions.